Resolve to Improve Your Fitness in 2018!

There are many ways to improve your health, but so many people still struggle with the dreaded process of making a New Year’s Resolution. My sister and her husband (aka Mr and Mrs Marathon) are avid runners, and have been absolutely smashing their goals, so I asked my Mrs Marathon to write a guest post about how she does it!


Oh, New Year’s. Saying goodbye to last year, celebrating the new one. Cue the reminiscing on the past year- good times and bad, successes and failures. As we approach the new year, we know what’s on everybody’s mind: resolutions! Now cue the groaning and eye-rolling. Nobody likes resolutions, simply because most of the time they just don’t work. Saying you want to lose weight or get in shape just doesn’t cut it. So instead of me just talking about resolutions that don’t work, I’m here to help revamp your resolutions for 2018 so they do work!

Because vague resolutions can be hard to stick to, I personally focus on concrete things for my goals. I like to set multi-level goals for the upcoming year, with room for adjustment if need be. For example, I am a marathoner. My goals are usually time goals that I want to achieve. I set my main goal of wanting to complete whatever distance run, then I set a reasonable time goal, and then I set a dream-big slightly far-fetched time goal that I would love to get if all the stars align on race day.

This is obviously not the only way to set fitness goals though. A lot of people want to set a goal like “I want to lose 10 pounds this year” and then they either meet the goal then relapse or lose motivation before reaching the goal. You can instead make your goal “I want to train for and complete a triathlon,” (or any other activity) and you may just reach that first goal of losing 10 pounds along the way unintentionally. With fitness goals, the possibilities are endless! You can always set a goal to try something new, go farther, be faster! You can try a new sport, like cycling (and of course hit up Chain of Fools Bicycle Repair for all your cycling needs). If you’re already a road cyclist, try mountain biking. Or give running or walking a try! Join a gym (and use the membership regularly!). If you have a hard time digging deep and finding the motivation for yourself, connect with a group that will keep you accountable. If you’re pretty well self-motivated, streaking can be fun (no, not that kind of streaking!). You can do an exercise streak! You can challenge yourself to exercise/run/bike/swim/whatever every day for the month of January and see how far you get and if you can even keep going. You can also set mileage goals for running, walking, or cycling. One of my favorite things to do is to track my miles run each month and compare it to months before. I also make little pictures of my mileage to post on Instagram, and getting all those likes from the running community is always a confidence booster!  Whatever it takes, right??


If all of this seems like too much to process at once, a simple way to slowly ease yourself into your fitness goals is to wear an activity tracker. I started wearing a tracker 3 years ago and was surprised at how lazy I can be! I set small goals each day to take more steps or have more active minutes and it really motivated me to get up and moving more. I currently have the Vivoactive 3 from Garmin and I love it! It’s a smart watch, fitness tracker, and GPS watch for tracking my running all in one.

But this leads me to the WHY. Why do we need to set goals like this? I know fitness and exercising isn’t everybody’s cup of tea. And hey, that used to be me until I found what worked for me. But the beauty of the fitness world and setting fitness-related goals is that, more often than not, there are positive side effects of achieving these goals, like weight loss, sleeping better, stress relief, building relationships, and health improvements. All of these things can make life better, so why not just give it a try?

I know we’ve all heard things like this before, but let me just leave you with this- no matter what you choose to do in the year 2018 with your goals and resolutions, just think about yourself this time next year. Do you want to look back and cringe, thinking “Oops, what happened to the year?” Or do you want to think “Wow, look at how far I’ve come this year!” So don’t let the year slip by you. Use this year to make yourself the best you that you can be. You’re amazing! Act like it. Show 2018 what you can do.


Now for the business plug! Chain of Fools is collecting fitness-related resolutions, and hoping to help you stick to them by making them concrete, and making them public. If you come write down your goal and post it with the others, I will give you 2 energy gels/bars, and enter you into a drawing at the end of the month for one of two $50 gift certificates. I’ll also follow up later in the year, and anyone who achieves their goals will get into a larger drawing, with better odds!

Shedding Some Light on Night Riding

Well, it’s been a great summer. Lots of miles, lots of dirt, lots of sweat, and maybe (probably) a little blood… Now fall is here, and it’s bringing pleasant weather, fewer bugs, no spider webs, and NIGHT RIDING! The days might be getting shorter, but it doesn’t mean you can’t keep riding. Night riding is a great way to continue riding during the most pleasant time of year, and it’s a whole new adventure. Shredding trails in the dark, all you have is a spotlight on the trail in front of you. Imagine going out a trail you know like the back of your hand, and having it feel totally different. You see new lines through familiar trails, every turn is a new thrill, and you ride every climb/descent a little differently than you would during the day. You’re seeing it in a new light, literally.

(Here comes the marketing part)

If this sounds like fun, you’re right, it’s a blast. It’s also not hard to do. All you need is a little knowledge of the trail you’re going to ride, a ride buddy (please don’t night ride alone), and good light. There are several options for night riding, depending how where you want to ride, how far/fast, and how often. If you just want to ride smooth trails or pavement occasionally, then you don’t need as much light, 200-400 lumens is plenty bright. Cygolite’s Dart 210 ($27.95) or Dash 460 ($51.95) are good options that I keep in stock here at Chain of Fools Bicycle Repair. If you’ll be riding on public roads, you need a red tail light too.

For singletrack, I recommend at least 500 lumens. The Cygolite Metro 700 offers great bang for the buck in this range, at $62.95.

Most lights come with a handlebar mount, which is good for slower riding, and smooth trails, but will sometimes leave you with blind spots going around sharp turns or over obstacles.

If you want to go faster, or ride rough, winding trails, it’s best to mount the light on your helmet, so it’s always lighting your field of view. This can be done with a velcro or adhesive light mount. Some helmets, like the Kali Protectives Lunati ($80) even have an integrated mount for a light or action camera. If you want to go all out, and ride like it’s daylight, then get two lights, one for your helmet, and one for your handlebar. This will give you the widest, brightest beam, and you will always be able to see what’s coming next.

If you feel pretty strong on the bike right now, maybe it’s because you’re in good shape, maybe your technique is on point, or maybe you’re just getting more confident. Regardless of what you’ve improved, it’s because you’ve been riding all summer.

Wouldn’t it be awesome if you could keep improving? You can; the key to long term improvement is consistent riding, all year long. Don’t let the clock or the calendar tell you when you can or can’t ride. Night riding is a fun change of pace, and another reason to go play in the woods!

Mountain Bike Suspension Maintenance

Whether you ride a hard-tail or a full-suspension bike, your suspension is a complex and lively component. It is constantly responding to you, and the trail underneath your tires. A well-maintained suspension smoothes out bumps and soaks up landings in an easier, more predictable, and more comfortable manner, allowing you ride faster, safer, and longer.

My KHS SF5500 after 30+ miles of Shiner's Revenge. Rides like this are very demanding on components, and require more frequent service to keep a bike in good shape

My KHS SF5500 after 30+ miles of Shiner’s Revenge. Rides like this are very demanding on components, and require more frequent service to keep a bike in good shape

A poorly-maintained suspension will respond slowly, roughly, and may buck unpredictably over bumps. This is obviously going to make your ride less enjoyable, but it may also be dangerous, causing you lose traction at a bad time, or (in extreme cases) if your fork or shock blows out.

A suspension fork is a surprisingly delicate and precise system

A suspension fork is a surprisingly delicate and precise system

So, what does your suspension need to keep it happy and healthy? Different manufacturers have different service requirements, but in general, most shocks, forks, and dropper seat posts (yep, those require maintenance too) should have rubber seals, o-rings, and oil changed once a year, or every 100 hours of riding. Additionally, full-suspension bikes, with multiple pivots in the frame, should be serviced with fresh grease and bearings in each of the pivots.

The service intervals for frame pivots will vary among manufacturers as well, but you’ll know something needs service if you can hear any creaking, popping, grinding, crunching, knocking, or if you can feel any side-to-side play in any part of the frame.

This Giant Trance came in for a mysterious "clicking" sound, it was due for a pivot overhaul

This Giant Trance came in for a mysterious “clicking” sound, it was due for a pivot overhaul

Now that you’re aware of your suspension’s special needs, I (and your bike) hope that you will bring your trusty steed for service at Chain of Fools Bicycle Repair. Due to the complexity of suspension components, and wide variety of required service parts, turnaround can potentially take a week or two, so winter is an ideal time to have your suspension serviced. If you can’t ride your mountain bike frequently, you may as well bring it in for this essential service procedure, so that when spring comes back around, your bike will be even better than when you hung it up for the winter! You might have forgotten how good it felt when it was new!


RockShox Logoxfusion-logo manitou_logo_850marzocchi-logo


Upgrading Your Mountain Bike – Part Three – Wheels

In this installment we will cover replacing the wheelset on the Stumpjumper.  A new set of wheels can easily be the best upgrade in terms of overall improvement that you can do to your bike.  A top quality set of wheels will be lighter and anytime that you remove rotational mass the improvement in feel is much more pronounced.  The increased quality in the hubs usually includes higher quality bearings that will allow the bike to roll further and faster with the same amount of pedal input.  Likewise, acceleration should be improved as well.  Having increased engagement points (the Industry Nine freehub will engage with only 3 degrees of rotation) in the rear hub will improve pedal response and help when climbing obstacles that require repositioning of the pedals.  Bottom line, wheel upgrades can completely change the feel of a bike.  Increased agility, control and responsiveness can be expected.

Stumpy w/Pike

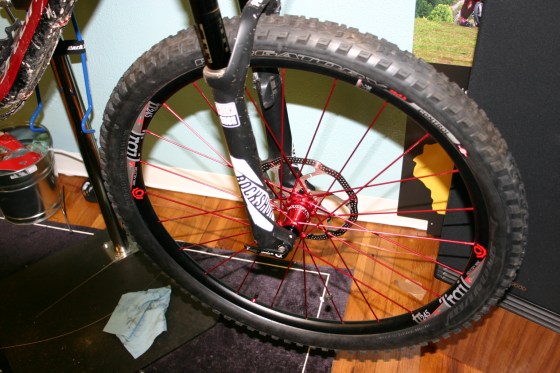
The Stumpjumper was originally equipped with a set of standard wheels that included a low engagement point rear hub.  These wheels were removed from the bike at the 75 mile mark and replaced with a set of Roval Control 29 wheels.  The Roval’s were narrow rim racing wheels that were lightweight, had DT Swiss 350 series hub internals with the Star Ratchet engagement system and came with a tubeless setup already installed.   They were a great set of wheels that performed well in all conditions.  The issue was that they were light weight racing wheels being used for trail riding.  The rear wheel went out of true and was not repairable.  So, enter the new wheels:  A set of Industry Nine Torch Trail 24.5s in the 24 spoke version.  These wheels are strong, wide, light and have a high engagement point rear hub.  They come with a tubeless kit installed and ready to go.  Install was not much more difficult than changing a tire.  The only additional steps were swapping the brake rotors and cassette on the rear.  Industry Nine is known for their multitude of color choices.  They have eleven different colors for the hubs and spokes.  You may mix and match as you see fit.  These wheels are a “standard” color scheme of black rims with red spokes and hubs.  Quite snazzy looking.

Industry Nine Trail 245

These wheels come from the factory tubeless-ready. Tape+Matching anodized valve=Useful AND Classy

These wheels come from the factory tubeless-ready. Tape+Matching anodized valve=Useful AND Classy

Rider feedback

Initial impressions: 

These are amazing wheels!  The first thing you notice is the sound of the rear hub.  Those engagement points make themselves known.  These wheels are very stiff.  It will take a bit of getting used to the lack of flex.  These things just don’t move very much.  They roll so easy!  Start on a downhill next to someone and you will walk off and leave them without pedaling.  These things are tough.  On the very first ride a fairly large stick got caught in the spokes of the front wheel and was slammed against the fork.  The stick was smashed into several pieces but the wheel received no damage.  This would have ripped several spokes out of the Roval wheel that was on previously.  These things look great, perform wonderfully and are even lighter than the Rovals that were on here before.  Industry Nine has a winner here.

Final verdict: 

If you need wheels, BUY THESE!  Cheaper than carbon, more durable and made in the USA.  WINNER!

Stumpy Rear I9

Stumpy Front I9

Upgrading Your Mountain Bike – Part Two – Front Fork


OEM Fox Performance Fork

In this installment we will cover replacing the fork on the Stumpjumper. Having a fork that is matched to the capabilities of your frame is a must. Going overboard on travel can not only result in a bike that is poorly balanced but it can void your frame warranty as well. Most frames can handle a small increase in travel without any concerns but check with the manufacturer of the frame if you are unsure. Most forks are also available in different offsets (usually 46 or 51mm) and frames are designed around a certain offset. Changing this will have an effect on the steering of the bike. Check the specs of your frame and if you are unsure, talk to someone at your local bike shop for recommendations. A new fork is a significant investment and we all want to spend our money wisely.img_0932
The Stumpjumper was originally equipped with a Fox Performance series fork with 130mm of travel. As with the shock, this is one of Fox’s lower end offerings. Also, like the shock, it is a decent unit but nothing to get excited about. After over four years of use, the fork was worn to the point that a rebuild did not make sense. The stanchions were showing major wear and would have to be replaced. It was only logical to choose a replacement that complimented the new rear shock. So, to go along the RockShox Monarch RT3, a RochShox Pike RCT3 was chosen to replace the original. This fork has a travel of 140mm. The frame is able to accommodate the increase without any difficulty. The install was straight forward with no fitment problems. When installing a new fork, the steer tube must be cut to match the length required by your frame. This is most definitely a measure twice, cut once, type of situation. If you have ANY doubts about doing this yourself, please have the install performed by a professional. New forks are not cheap and the last thing anybody wants to do is render a brand new fork useless by cutting the steerer tube too short.

img_0934

Stumpy w/Pike Front

img_0941

Stumpy w/Pike

Rider feedback

Initial impressions:

Oh wow! This thing is awesome. Plush, controlled and responsive. So many adjustments that it will take a while to get it dialed in completely. Loving it so far. It matches the dampening characteristics of the Monarch perfectly. Flex in the chassis is reduced dramatically. So much, in fact, that line choice has become more difficult. After riding the OEM fork for so long the flex in corners made it necessary to try and corner a little tighter. Take the same approach with the Pike and you will end up off the trail. Flex is no longer enough to require course correction. Much less fore and aft flex during braking as well.

Final verdict:

Now it is obvious why so many top end bikes come with this fork from the factory. After riding with this for several months there are no real drawbacks. It just does its job and does it well. If there was anything that could be listed as a con, it would be that increasing the travel to 140mm tipped the balance of the bike toward the downhill and made it SLIGHTLY less efficient climbing. This is not a problem with the fork, just in the travel selected. All in all, the Pike has completely transformed the Stumpjumper from a good bike to a great one. Not cheap but oh so worth it.

img_0937

Upgrading Your Mountain Bike – Part One – Rear Shock

In this installment we will cover replacing the rear shock on the Stumpjumper.  Having a shock that is tuned properly and in good working condition is vital on a full suspension bike.  The shock controls the movement of the swing-arm and keeps the rear tire in contact with the ground.  A poorly matched shock/suspension combo can make a bike miserable to ride.  Excessive bob, kickback and all-around poor manners can result.  Therefore it is important to make sure that the shock you choose is right for your bike.

It’s a pretty good shock, but after 4 years of hard use, it could be a lot better

The Stumpjumper came with a Fox Triad II shock.  This is one of Fox’s lower end offerings.  It is a decent shock but nothing to get excited about.  After over four years of use, the shock was in desperate need of a rebuild.  Rather than spend the money to rebuild the so-so Fox, it was decided that an appropriate upgrade was in order.  A RockShox Monarch RT3 was chosen to replace the Fox.  This particular model Monarch is designed to fit the proprietary shock clevis mount that is on Specialized frames.  Trek bikes also require a shock that fits a proprietary mounting system and RockShox is happy to oblige.  The install was relatively straight forward with the only hiccup being a too long OEM rear mounting bolt contacting the seat tube when the shock was fully extended.  A visit to the bench grinder took care of any issue.  Once the bolt was ground down and everything was buttoned up, it was time for the test ride.

Dang Specialized, why do you have to be so....specializedDang Specialized, why do you have to be so….specialized

No shock

RockShox Monarch RT3

The bolt to mount the bottom of the shock to the frame, above and behind "FSR", was slightly too long, but it didn't take long to fix that hiccup

The bolt to mount the bottom of the shock to the frame, above and behind “FSR”, was slightly too long, but it didn’t take long to fix that hiccup

img_0927

Rider feedback

Initial impressions: 

Overall control is vastly better than the OEM shock.  Square edge hits are no longer a problem with the Monarch controlling the rebound with ease.  Pedal bob is less and the pedal platform on the shock is strong without killing all of the small bump compliance.  Looking forward to getting it completely dialed in.

Final verdict: 

This is the type of shock the bike should have come with from the factory.  The OEM shock can’t hold a candle to the Monarch, even when it was new. Performance has increased in every parameter.  Compliance for small and large bumps has markedly improved.  Rebound is controlled much better with less snap back on sharp peaks.  Overall this is a great improvement and definitely worth the price.

Main Traingle Stumpy w/RT3

RockShox Monarch RT3 c/u

Upgrading Your Mountain Bike – A Case Study

One of the most addictive parts of mountain biking is buying and installing upgraded parts. Whether it is new cranks, wheels, gears or grips, the temptation is always there. We all suffer from the dreaded Upgrade-itis at one time or another. Since it is almost inevitable, learning to choose upgrades wisely is very important. That is what this series will focus on.

The bike that is the subject in the series is a 2012 Specialized Stumpjumper FSR Comp 29 (say that three times real fast). It was purchased new in November of 2011 has had one owner. Overall the bike is in very good condition with only the normal wear and tear present.

This is our willing test subject. 2012 Specialized Stumpjumper FSR Comp 29

This is our willing test subject. 2012 Specialized Stumpjumper FSR Comp 29

That brings us to the first point. Should I upgrade my bike? The answer is maybe. If you have a bike that is in good condition with no excessive wear, fits you well and you enjoy riding, then upgrading parts makes sense.

Point two is What should I upgrade? and that is a bit harder to answer. The best guideline is to replace things as they break or wear out. Also, if you are riding beyond the capabilities of a certain part. This usually leads to part failure rather quickly, but not always. There is also upgrading just because you want to. There is nothing wrong with this. Just be aware that changing out parts is not going to make you go faster or jump higher unless you were exceeding the capabilities of the original parts.

That brings us to the Stumpjumper. The upgrades were done in three phases over a period of about five months to allow each upgrade to show its merit and to let the rider appreciate the differences the new components made. In the interest of fairness, it must be noted that this bike was far from stock before this series began. It had several upgrades previously. Parts one and two will deal with replacing the stock shock and fork, while the third installment will cover changing a previously upgraded set of wheels with another aftermarket set. Each installment will include an initial ride report and an additional report after about half a dozen rides. The idea is to give you, the reader, a little insight into choosing upgrades that will give you the most bang for your buck.

First up, changing out the original rear shock!

Bike to Work Fridays!

Have you ever thought about how many short trips you take in your car? Maybe your office is 3 miles away from home, or you might live just 1 mile from the nearest grocery store. What if you didn’t have to drive on those short trips, what would change? Well, your car would take less wear and tear, because those short trips put more stress on your car than highway driving. That means you use less gas, and save a few dollars. According to the League of American Bicyclists, the average annual cost for maintaining a car is about $8000 per year (nationally), compare that to the $300 per year it costs to keep to a bike in good shape (again, national average), and it starts to make sense how much these short trips cost.

Saving money isn’t the only reason to ride on a daily basis though. Just like any other physical activity, biking is good for you. It burns calories (around 400 on a 10 mile round trip), lowers stress, and generally improves your physical and mental health. If your excuse for not exercising more often is “I don’t have enough time”, then riding your bike to work is a great way to multi-task!

Biking to work might seem like a drastic lifestyle shift, but it doesn’t have to be! A great way to start is to leave your car parked 1 or 2 days a week, when the weather is nice. If you think you might want a sample of “Life in the Bike Lane”, try riding to work (or errands, or social engagements) on Fridays. If you do, let me know! I’ll be watching Strava, MapMyRide, Facebook, and Instagram for bike commuters, use the hashtags #BikeToEverywhere, #BikeToWork, or #LifeInTheBikeLane. Chain of Fools will be giving out discounts and other perks to anyone who participates! If you have any questions, or need help figuring out how to make your ride easier, safer, or more fun, just call or drop by (preferably on a bike) Chain of Fools Bicycle Repair!

Schwinn Suburban

Thanksgiving Break

Closed Thanksgiving Day and Black Friday, OPEN Small Business Saturday!

So I’m going to have to put a hold on some of my repairs for the next few weeks. Apparently mountain biking can be dangerous, who knew? Last week while riding I went over the handlebars, and flew directly into a tree, torpedo-style. End result: I fractured my scapula (shoulder blade) on my left side. The injury itself is not too serious, but it is painful, and I have spend the next couple of weeks in a sling, to keep it immobilized. It’s fairly inconvenient, yes, but I’m not going to let it get me down. I’m already feeling noticeably better, just week after the crash, and I’ve got a fair amount of movement back. I’ve started testing my arm, to see what repairs I can still do. I can continue performing some service, just not all of it, and not particularly fast. And in case you were wondering, don’t worry, my bike wasn’t hurt in the crash.2015-11-18 23.37.41

Trail Building Nov 5 & 7 – Help Wanted

Hopefully by now everybody in the MHC area who is at all interested in mountain biking has been out to Mountain Laurel Trails. It’s an awesome trail system off of 58 west in Horsepasture, and it’s currently around 7 miles of singletrack. Well Bob Norris (landowner, trail builder, and mtn biker) has done a fantastic job with it (mostly by his own power) and wants to round it out to an even 10 miles! There will 2 trail building events this week, and YOU can help finish it. If you have any time/energy to spare, we’d love to see you, even if it’s only for an hour or 2. This should be a productive week, there will be 3 trail machines, and if enough folks turn up, we can knock it out with minimal sweat.

Thursday, Nov 5, 9:00am

Saturday, Nov 7, 8:00am

If you have questions, or want to RSVP, contact Bob (276-340-9144) or join the Facebook Events (linked above^)

Mountain Laurel Trails Website

Proudly powered by WordPress
Theme: Esquire by Matthew Buchanan.